


A concrete base provides your shed with the most durable and long-lasting foundation, offering a stable, level surface that protects against ground movement and moisture. If you have a large shed, workshop or log cabin, concrete provides a rock-solid support.
If you’re reasonably fit and comfortable with DIY, laying a concrete base is a straightforward job that can be completed in a day. Here’s how to build a concrete foundation for your garden shed.
Building a concrete shed base, at a glance:
- Choose the right location for your shed
- Prepare the site
- Work out how much concrete you’ll need
- Construct the timber frame
- Add a damp proof membrane
- Take safety precautions
- Mix and pour the concrete
- Level and finish the surface
- Allow the concrete to cure
- Install your shed on top of the base
What you’ll need:
- Concrete materials: sand, cement, water, or ready-mixed concrete.
- Measuring and marking tools: tape measure, pegs, string, set square and spirit level.
- Excavation tools: spade, rake and earth rammer.
- Sub-base materials: MOT Type 1 hardcore and compacted sand.
- Timber for formwork (around 25mm thick).
- Concrete mixing equipment: cement mixer (or mixing board), wheelbarrow.
- Levelling tools: tamp board and edging trowel.
- Damp-proofing: heavy-duty plastic sheeting (DPM).
- Protective gear: gloves, safety goggles, long-sleeved clothing, rubber boots and a hard hat.
1. Choose the right location for your shed

Picking the best spot for your shed is key to making sure you get the best use from it and that it stands the test of time. Ideally, the site should be level and well-drained, with a one-metre gap between the shed and any nearby walls or fences. This allows space for construction and future maintenance, as well as ventilation, helping to prevent damp buildup.
If your shed needs electricity or water, consider its position in terms of mains supplies. If it’s positioned in a shady area, natural light might be limited – though too much direct sunlight can cause overheating, so balance is important.
2. Prepare the site

Once the location is decided, it’s time to mark out and level the area. Start by measuring out the base with dimensions slightly larger than the shed itself – at least 100mm wider and longer, plus an additional 75mm for the timber formwork. Use pegs and string to outline the perimeter and check that the area is square by measuring the diagonals – they should be equal.
With the area marked, clear away all vegetation, turf and debris. The next step is excavation – dig down to a minimum depth of 150mm, allowing for 75mm of hardcore and 75mm of concrete. Compact the earth firmly using an earth rammer to create a solid foundation.
To enhance load-bearing capacity, spread MOT Type 1 hardcore evenly across the base and compact it thoroughly. This layer provides stability and prevents the concrete from cracking under pressure. Over the hardcore, add a thin layer of sand – this stops sharp stones from puncturing the damp-proof membrane that you’ll be adding.
3. Work out how much concrete you’ll need
To work out how much concrete you need for your shed base, multiply the slab's depth, width and length. Concrete is measured in cubic metres.
Example calculation:
- Base dimensions: 3m x 2m, 100mm deep
- Volume calculation: 0.10m x 3m x 2m = 0.60 cubic metres
- Add 10% contingency: Round up to 0.70 cubic metres
Always prepare slightly more concrete than you calculate for. It's better to have an excess than to run out mid-project.
4. Construct the timber frame
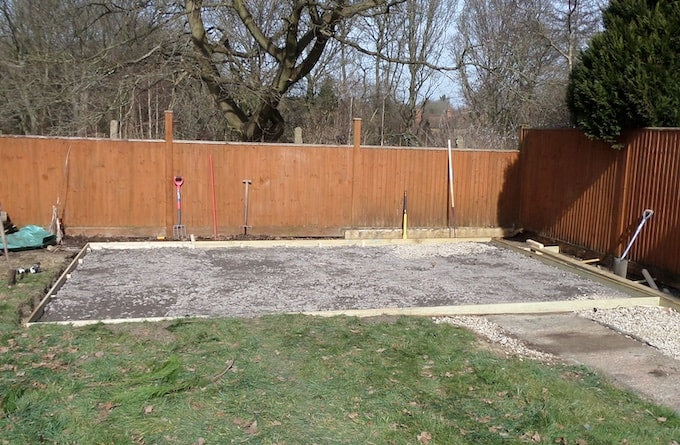
To keep the concrete contained and properly shaped, a timber frame (formwork) must be built to match the internal dimensions of the base. Construct the frame using 25mm thick planks, making sure it’s square by checking the diagonal measurements.
Position the frame on top of the sub-base and secure it with wooden pegs at 600mm intervals. The pegs should sit below the top of the frame, so they don’t interfere when levelling the concrete later. Use a spirit level to make any final adjustments, making sure everything is perfectly even before you continue.
5. Add a damp-proof membrane
Before pouring the concrete, lay a heavy-duty plastic damp-proof membrane (DPM) across the entire base area. The sheet should be turned up at the edges to create a tray-like effect, stopping moisture from seeping into the slab from below.
If multiple sheets are required, overlap and tape the joints to provide full coverage. This reduces condensation inside the shed and helps the concrete cure more effectively, minimising the risk of cracks.
6. Take safety precautions
Concrete is a highly caustic material, meaning it can cause severe skin and eye irritation if not handled properly. Safety should be your top priority when working with wet concrete. Always wear long-sleeved clothing and trousers to prevent skin contact, rubber gloves and boots to protect hands and feet from burns, safety goggles to shield your eyes from splashes, and a hard hat to prevent dust or cement particles from falling onto your face.
If wet concrete comes into contact with your skin, wash the area immediately with clean water. Avoid kneeling in fresh concrete, as prolonged exposure can cause chemical burns.
7. Mix and pour the concrete
Now it’s time to mix and pour the concrete. If using a ready-mixed batch, follow the supplier’s instructions. For a DIY mix, combine one part cement to five parts ballast (sand and aggregate), adding water gradually until you get a workable consistency.
Since concrete starts to set within two hours, work efficiently for even distribution – but don’t rush or cut corners! Pour the first layer into the frame, making sure it fills all edges and corners. Use a rammer to compact the mixture and eliminate trapped air pockets. Tapping the sides of the formwork with a hammer helps to release additional air bubbles and ensure a solid, durable finish.
Continue adding concrete in layers until it slightly overfills the frame. This allows for levelling in the next step.
8. Level and finish the surface
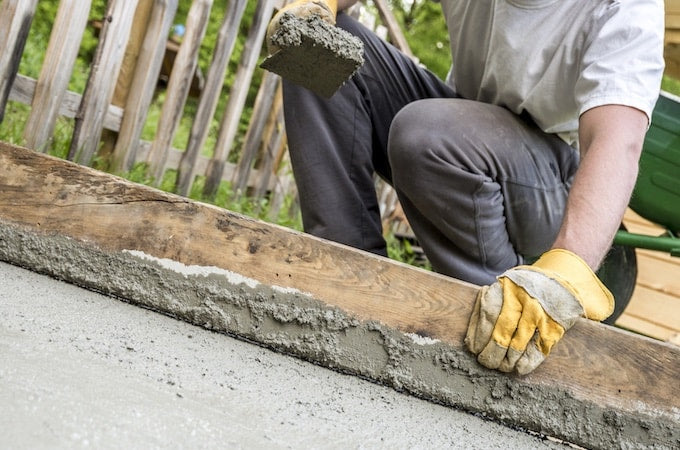
To achieve a smooth and even surface, use a tamping beam (a long, straight timber). Move it in a sawing motion across the slab, working from one end to the other. Repeat the tamping process multiple times to remove any remaining air pockets and create a flat, compact surface.
Covering the slab with a raised polythene sheet will help prevent it from drying too quickly, which can cause cracks. Moisture retention is key to a strong, durable concrete base.
9. Allow the concrete to cure
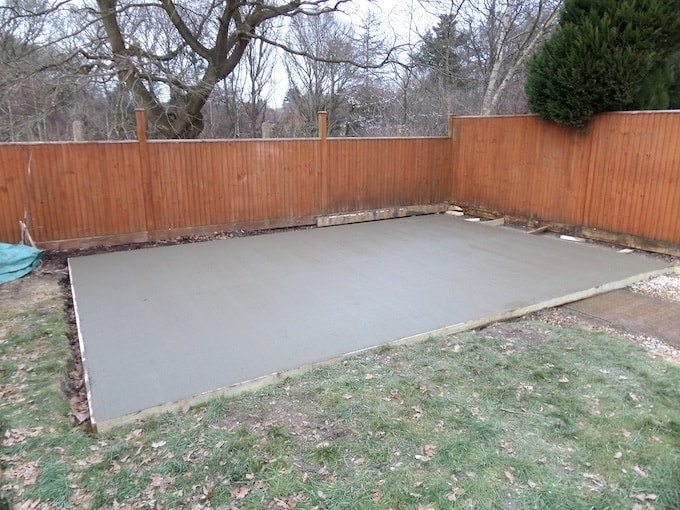
Patience is crucial when it comes to concrete curing. While the surface may seem solid within a couple of days, the slab will need around 28 days to fully cure and reach maximum strength.
Wait at least three days before removing the timber frame. If rain is forecast, cover the slab with plastic sheeting to prevent excess moisture. In hot weather, spray the surface with water and cover with damp sheets to slow the drying process, reducing the risk of cracking.
10. Install your shed on top of the base
Before installing your shed, lay floor bearers on top of the cured concrete. These create a small gap between the shed and the base, improving airflow and helping to prevent damp from accumulating beneath the structure.
Use 75mm x 50mm pressure-treated timber bearers to protect against rot and insect damage. Position them at equal intervals of 400-600mm, running perpendicular to any built-in floor joists in your shed. Check that they’re level using a spirit level before going ahead with the shed assembly.
With a solid, well-prepared concrete base, your shed will have the stability and durability it needs to last for years to come. Get more shed-building tips with our how-to guides.
MORE HELP
Visit the Waltons help pages or the Waltons garden building how-to guides for advice, tips, and all things sheddie.
